Taming the
Cisco Nexus 9000
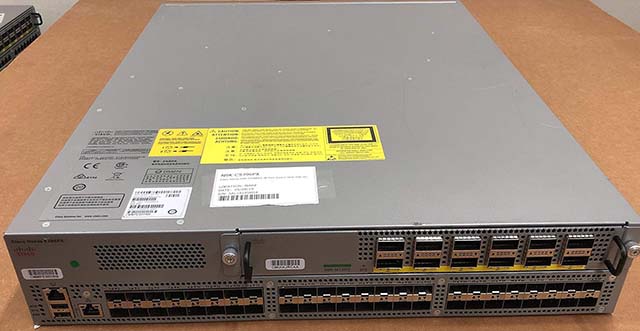
A while back, I made the decision to move our home network to 10 gigabit Ethernet. I use a lot of virtual machines and disk images, and some fairly huge (>20GB) SQL databases. We have a lot of home automation, and my partner likes to listen to videos overnight... all things considered, the whole house sharing a gigabit backbone was just not working terribly well anymore. So, I went looking for a couple of switches capable of 10G speeds. First, I found a pair of Brocade ICX6450-48 switches with four SPF+ ports apiece, fixed some licensing nonsense using instructions at the most excellent fohdeesha.com, and installed 10G fiber between our upstairs and downstairs networks. This worked for a while, but after equipping all my newish Macs with 10G cards (because Thunderbolt is awesome), I ended up with a few too many devices on 10G for the Brocade switches to support alone. Looking for an inexpensive switch with at least ten 10G capable SPF+ ports, I discovered that I could either pay over $125 for a no-name switch on Amazon, or I could pay a fraction of that — in this case, $65 with free shipping — for a Cisco Nexus N9K-9396PX datacenter switch with 48 SPF+ ports and ten 40G capable QSPF+ ports. A switch that sold new for more than $26,000. The math was hard to argue with. Knowing datacenter gear, I figured I might have some loud fans to contend with...
A few days later, UPS delivered this ridiculously overbuilt steel monster, which must have cost more to ship than I paid for the whole thing, and I fired it up. The fans indeed sound like three DC-3s taking off in tandem, being chased by banshees with kazoos. That was not going to ensure domestic tranquility, sitting in our basement. So I dug into it. Pulled the fans, pulled the documentation. Cisco doesn't have hardware docs this detailed, and apparently not many folks have opted for these beasts as a home switch, so my hope for some DIY fan swap instructions didn't pan out. I was on my own.
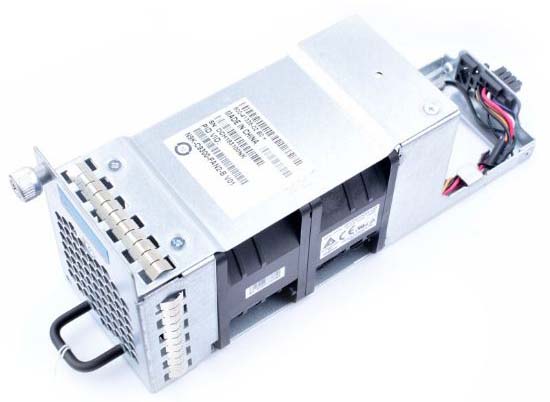
This chonky bastard is a Nexus 9000 pusher fan module (Nexus switches support either pusher or puller fans, depending on rack configuration). It has two 60mm 12V PWM Sanyo Denki fans with tachometer leads (badged in a tandem pair as the San Ace 60), and an eight-pin Molex self-centering connector, of which seven pins are used. There's no indicator on the fan module, but there is an acrylic light pipe — interesting choice — channeling light from status LEDs on the mainboard. The switch has three of these modules, all of course hot-swappable. Reviewing Cisco documentation, I learned that one fan per module can fail in these switches without triggering an alarm condition, and one entire fan module can fail before the switch itself alarms out. So that gave me some hope of silencing the beast by dropping down to three fans instead of six. Immediately, Noctua came to mind. They make strong, quiet fans that I've used extensively in vintage computer equipment and in the aforementioned Brocade switches, and they offer a 12V 60mm fan with PWM imput and tach output — the NF-A6x25 PWM. Perfect! The next challenge was determining pinouts. Red and black were clearly power and ground. They feed without a color change to one of the two fans, and become orange and black to the other. Since you only need one fan per module to keep NX-OS happy, I figured, let's use red and black, and leave the orange and other black leads unterminated. Cutting all the wires that lead to the rear fan leaves four wires to the front fan: +12V red, GND black, and brown and yellow. Assuming the yellow lead follows the standard for a tachometer (RPM speed) signal, cutting that lead should cause the switch to register a fan failure... which it does. That leaves the brown lead as PWM control. Easy enough. Matching these to Noctua's weird color codes for their PWM fan was then trivial. I decided to graft Noctua's provided extension cable onto the Cisco fan module harness, leaving the fans unmodified, therefore easily replaced. I expect to be using this switch for the next decade, unless I *really* need 100G Ethernet at some point..! So, here are step by step instructions for anyone else interested in taming the loud fans on a Cisco Nexus 9000 series switch. You will need at minimum a good pair of wire cutters and strippers, solder, flux, a soldering iron and sufficient skill to use it, heat shrink tubing of various sizes and a heat source, and either an appropriately sized M4x0.7 bolt or an M4x0.7 thread cutting die. And here are the pinouts by themselves, for those who prefer to live dangerously. So far, the switch has been a great value, though it's much pickier than the Brocades about optical media, and I cannot overstate what a great huge enormous steel motherfucker it is. It's two rack units high, but as deep as four of my Brocade switches, and the approximate mass of a dorm fridge full of dominoes. Oh, and officially, you're not supposed to be able to get firmware for it without a Cisco contract — "pull the other one, it's got bells on." The internet is of course a font of all things, including Cisco firmware for mere mortals. This information is supplied solely for educational purposes, and no claims are made as to its ownership or its fitness for any task. Commercial distribution or sale is strictly prohibited. All rights are retained by the original creators. |
|
|
Home FAQ The Files Full Text Search Site Updates
SheepShaver Unofficial Taming the Nexus 9000
Contents provided for educational purposes only.
Last modified Tuesday, 17-Jun-2025 05:04:47 UTC


